Peace
Ta!
- Joined
- Jun 7, 2005
- Messages
- 430
Now that I've finally got some time on my hooves...
Time to make some Mermaid Ponies! This would probably be considered an advanced tutorial, since I kind of make the assumption that anyone who tries this has had some customizing experience before now.
-----------------------------------
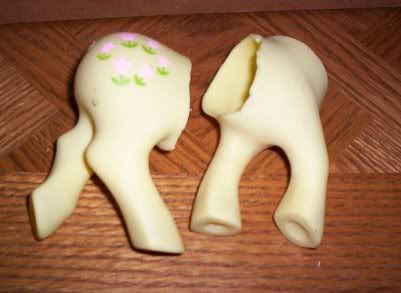
Select a pony you wish to customize. Remove the head and tail, then cut the main body in half, along the barrel (middle) of the pony. Make sure you avoid any raised areas where the rear legs once were. Some ponies have short midsections and you might have little choice as to where you make your cuts.
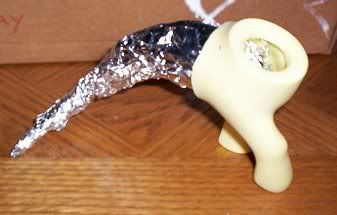
Now take a square of aluminum foil (roughly 12" on all sides) and crumple it up into a cone shape, the widest point of which must be able to fit inside the pony body cavity. This is going to be the main support for the tail. Adjust the cone to fit snugly inside the pony, by at least 1/2 an inch overlapping the interior of the pony. I had something more akin to a whole inch.
At this juncture you can roll out your clay. You can use an air dry clay or oven bake, just make sure that the piece you roll out will easily wrap around the aluminum foil on the pony. It doesn't need to be too thick or particularly thin, just thick enough so that the rough foil won't easily show and the clay will not crack.
Now wrap the clay around the foil on the pony body. Cut away any access and blend the seams together with your fingers. I didn't overlap any clay onto the pony body, just making it flush against the seam of the cut edge along the plastic body.
The foil tail may want to slide out of the pony body as your'e working. That's okay! Don't worry about perminantly securing the tail in place until after the tail is dried or oven cured.
At this point you can actually bend and manipulate the mermaid tail into a pose or position you are sure you want. The aluminum foil allows you to do this, also giving support while the tail dries, make sure it balances well by putting the head back on the pony briefly. The clay will help weight the tail down but some ponies just aren't balanced well..
When you find a position you like, you can make fins. Just take two pieces of clay, the same size, and mold them into simple wing shapes. Then just mold them onto the tip of the tail. You can still bend the tail around before it dries or is baked, just becareful not to damage your fins. (I wasn't happy with Posey's pose and managed to crack the fins slightly when I moved the tail around. I had to glue them back on after she came out of the oven)
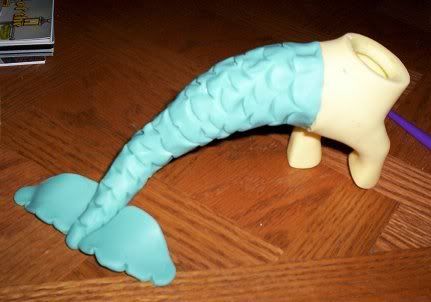
Now you can decorate if you like! I have lots of different clay tools at my disposal, but you can use marker caps to make half-moon shapes for scales. Cut other pieces out as decorative touches... like Posey's flower symbol! Just put them in place before you dry or bake.
Now let your pony air dry or bake in your oven as per manufacturers instructions. Remember that the lower oven temperatures don't harm ponies but I wouldn't want to see what would happen if hair or bits melted off. When the tail is done pull the aluminum foil out of the body cavity and glue it perminantly in place.
-TIP- You can help keep delicate items in place by propping them up with something else. The one fin on Posey's tail that is in an up position was kept there by a spoon while she baked in the oven.
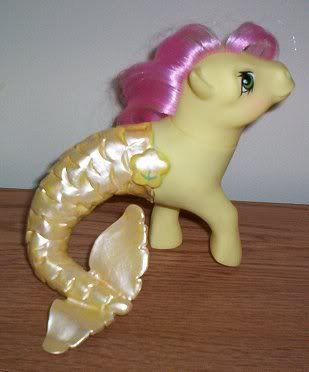
As you can see Posey's tail didn't start out yellow. The only color clay I happened to have on hand at the time was green, but that also helped show detail as I was taking progressive pictures. I then painted two base coats of white to cover the green, then a bold yellow. I painted her tulip symbol, and finished it with a light wash of an off-white metallic paint.
Finis!
-------------------------
If anyone has any questions, let me know. I can adjust the directions accordingly or just answer them.
Time to make some Mermaid Ponies! This would probably be considered an advanced tutorial, since I kind of make the assumption that anyone who tries this has had some customizing experience before now.
-----------------------------------
Select a pony you wish to customize. Remove the head and tail, then cut the main body in half, along the barrel (middle) of the pony. Make sure you avoid any raised areas where the rear legs once were. Some ponies have short midsections and you might have little choice as to where you make your cuts.
Now take a square of aluminum foil (roughly 12" on all sides) and crumple it up into a cone shape, the widest point of which must be able to fit inside the pony body cavity. This is going to be the main support for the tail. Adjust the cone to fit snugly inside the pony, by at least 1/2 an inch overlapping the interior of the pony. I had something more akin to a whole inch.
At this juncture you can roll out your clay. You can use an air dry clay or oven bake, just make sure that the piece you roll out will easily wrap around the aluminum foil on the pony. It doesn't need to be too thick or particularly thin, just thick enough so that the rough foil won't easily show and the clay will not crack.
Now wrap the clay around the foil on the pony body. Cut away any access and blend the seams together with your fingers. I didn't overlap any clay onto the pony body, just making it flush against the seam of the cut edge along the plastic body.
The foil tail may want to slide out of the pony body as your'e working. That's okay! Don't worry about perminantly securing the tail in place until after the tail is dried or oven cured.
At this point you can actually bend and manipulate the mermaid tail into a pose or position you are sure you want. The aluminum foil allows you to do this, also giving support while the tail dries, make sure it balances well by putting the head back on the pony briefly. The clay will help weight the tail down but some ponies just aren't balanced well..
When you find a position you like, you can make fins. Just take two pieces of clay, the same size, and mold them into simple wing shapes. Then just mold them onto the tip of the tail. You can still bend the tail around before it dries or is baked, just becareful not to damage your fins. (I wasn't happy with Posey's pose and managed to crack the fins slightly when I moved the tail around. I had to glue them back on after she came out of the oven)
Now you can decorate if you like! I have lots of different clay tools at my disposal, but you can use marker caps to make half-moon shapes for scales. Cut other pieces out as decorative touches... like Posey's flower symbol! Just put them in place before you dry or bake.
Now let your pony air dry or bake in your oven as per manufacturers instructions. Remember that the lower oven temperatures don't harm ponies but I wouldn't want to see what would happen if hair or bits melted off. When the tail is done pull the aluminum foil out of the body cavity and glue it perminantly in place.
-TIP- You can help keep delicate items in place by propping them up with something else. The one fin on Posey's tail that is in an up position was kept there by a spoon while she baked in the oven.
As you can see Posey's tail didn't start out yellow. The only color clay I happened to have on hand at the time was green, but that also helped show detail as I was taking progressive pictures. I then painted two base coats of white to cover the green, then a bold yellow. I painted her tulip symbol, and finished it with a light wash of an off-white metallic paint.
Finis!
-------------------------
If anyone has any questions, let me know. I can adjust the directions accordingly or just answer them.
Last edited: